Once you have set your guitar up, set the pedal board and dialed your ideal tone into your amp, your creative juices should be ready to flow. However, if you don’t mic your amplifier properly, you won’t get the sonic results that you want.
So how do you approach micing up your guitar amp? Read on for tried-and-true methods that you can put to work the next time you need to mic a guitar amp.
Select your mic
While we can get into an extremely detailed discussion about what kind of mic to choose for what kind of needs, we will stick to telling you that if you have a choice, practically any dynamic microphone is a good place to start when micing a guitar amp.
How to move the mic?
Moving a microphone even an inch will have a big impact on your guitar sound, so how do you dial in a good sound fast, without moving your mic around in circles for hours? Keep these fundamentals in mind, and you’ll be able to find your mic’s sweet spot with any amp.
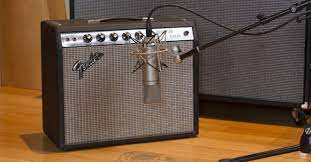
A good starting place for micing with a typical dynamic mic is halfway between the center and edge of the cone, with the mic capsule pointed directly at the speaker, leaving just enough room to slide your pinky between the mic and grille cloth.
Moving the microphone closer to the amp’s speaker will boost bass frequencies, and moving farther away will reduce the overall bass response of your recorded tone. (This rule does not apply to omnidirectional microphones, but in most cases you should stay away from an omni mic for close-micing.
Moving the microphone sideways, closer to the surround edge of the speaker, will reduce midrange and upper-mid frequencies. Moving the microphone toward the center of the speaker will emphasize midrange frequencies.
Aiming the mic at the center of the speaker will result in a brighter sound. Moving the mic toward the outer edge of the speaker will reduce the brightness and give you more low end.
Angling the microphone at a 45-degree angle can sometimes tame harsh high frequencies. However, the end result will depend on the mic being used. For a good start, point the mic directly at the speaker, at least until you’ve found the right distance and mic position on the cone.
Use your ears to find the right spot to mic
If your amp is producing the tone you want to hear, your goal is to find the mic position that best represents what the amp sounds like when you’re standing in front of it. Where you first place the mic is much less important than the act of listening.
Hear what the mic is capturing, decide what needs to change, and move the microphone according to the tips above. Too boomy? Back the mic off an inch or two. Lows and highs sound good, but not enough midrange growl? Start moving the mic closer to the center of the speaker, farther away from the edge.
And remember that when we say “move the microphone,” we’re talking inches, not multiple feet. Small changes in mic position result in big sonic differences. Start close from a couple of inches away to right on top of the grille cloth.
Avoid these common mic-ing mistakes
Don’t record too hot assuming you’re recording digitally, you shouldn’t have the microphone signal peaking close to 0dBFS (0 decibels Full Scale). Back off the recording level to prevent unwanted digital clipping.
Don’t try to “fix it in the mix.” Try to get the best sound right at the source, it will make the whole production process easier.